Every week someone asks me some version of "So how does this AI stuff actually work?" Usually they've already heard five acronyms, tried a chatbot, and come away with the feeling that everyone else got a manual they didn't.
This is that manual. No math, no hype, five diagrams, and for every concept a section on what you can do with it at work on Monday morning.
The map: where each piece fits
Before the details, here's the whole stack. Most of the confusion around GenAI comes from people talking about different layers as if they were the same thing.
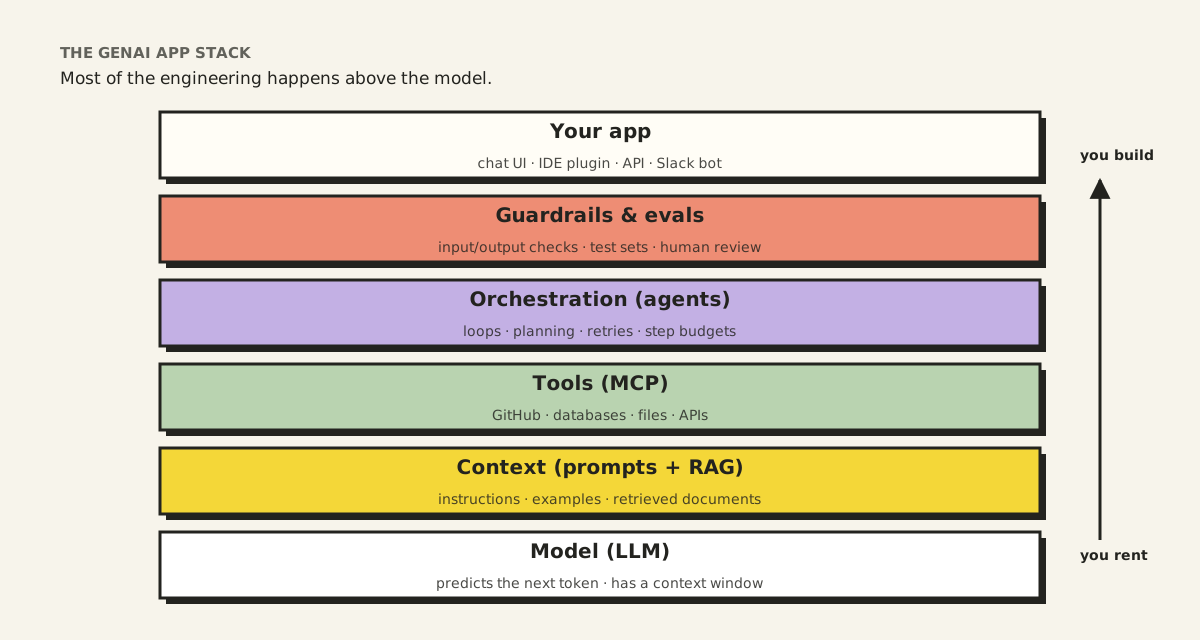
Read it bottom-up:
- Model. The large language model (LLM) itself: GPT, Claude, Gemini, Llama. You almost always rent this through an API.
- Context. Everything you put in front of the model: instructions, examples, and documents. RAG lives here.
- Tools. Ways for the model to do things: search, query a database, open a pull request. MCP standardizes this layer.
- Orchestration. The logic that chains calls together, including agents that loop until a job is done.
- Guardrails and evals. Checks on what goes in and comes out, plus tests that tell you whether a change made things better or worse.
- Your app. The thing a user actually touches.
The single most useful sentence in this post: the model is the commodity; the layers above it are the product. Two teams using the same model can ship wildly different quality, and the difference is almost entirely context, tools, and evaluation.
Part 1: What happens in one LLM call
An LLM does one thing: given some text, it predicts the most likely next token (a word or a piece of a word). Then it appends that token and predicts again. A full answer is that loop run a few hundred times.
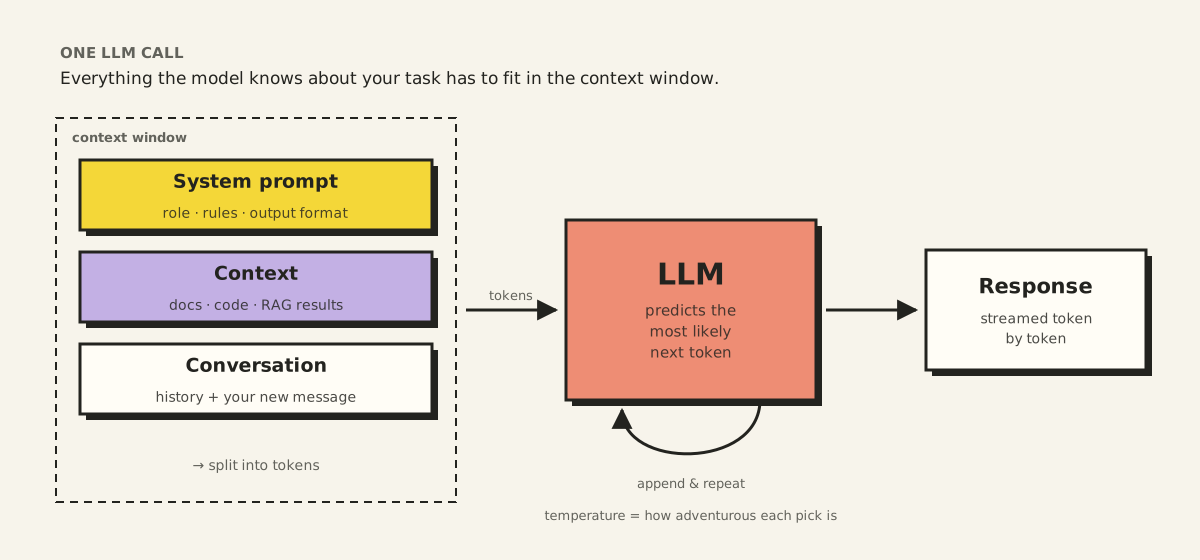
Four terms do most of the work:
| Term | Plain meaning | Why you care |
|---|---|---|
| Token | A chunk of text, roughly ¾ of an English word | You pay per token, and limits are counted in tokens |
| Context window | The maximum tokens the model can see at once (prompt + answer) | Anything outside it does not exist to the model |
| System prompt | Standing instructions: role, rules, output format | The most reliable place to put constraints |
| Temperature | How adventurous each next-token pick is | Low for code and facts; higher for brainstorming |
The key insight is the second row. The model has no memory between calls and no access to your systems unless you put the information in the context window. When people say a model "doesn't know" something, they usually mean nobody gave it the information.
Use it on Monday: better prompts
You don't need an API key to benefit from this. You need better prompts, and a good prompt is just a good brief:
Role:     You are a senior backend engineer reviewing a pull request.
Context:  <paste the diff and the related function>
Task:     Find bugs, race conditions, and missing error handling.
Format:   A table with columns: severity, line, problem, fix.
Limits:   If something looks fine, say so. Don't invent issues.
Everyday wins that work today:
- Explain an error. Paste the full stack trace and the function it points to. Ask for the three most likely causes, ranked.
- Write the boring tests. Paste a function; ask for table-driven tests covering edge cases (empty input, nulls, boundaries).
- Translate between languages. "Rewrite this Python script as a Node.js CLI with the same flags."
- Draft a regex or SQL query, then make it explain itself. Always ask for an explanation and three example inputs that should not match.
- Turn notes into docs. Paste your messy notes; ask for a README with install, usage, and troubleshooting sections. Then run every command yourself.
Part 2: RAG, or "look it up before you answer"
A model trained in the past knows nothing about your company's wiki, last week's release notes, or the PDF on your desktop. Retrieval-augmented generation (RAG) fixes that by fetching the relevant pieces of your documents at question time and putting them in the context window.
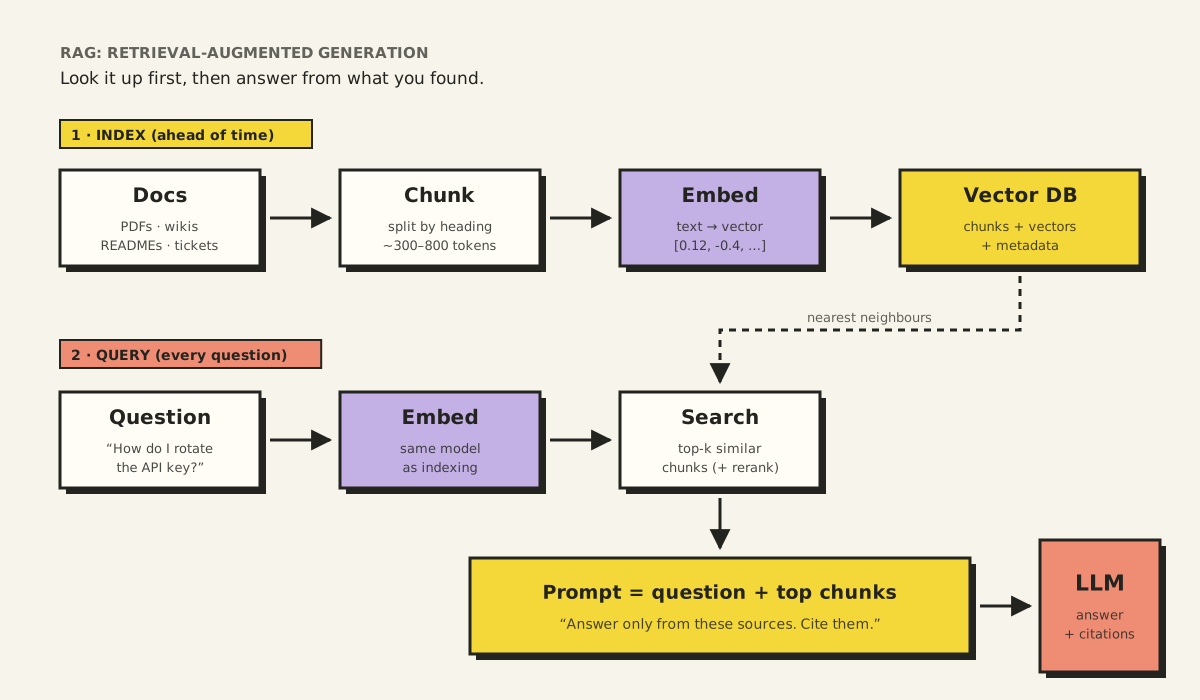
It has two phases:
Indexing (once, ahead of time)
- Collect documents: wikis, PDFs, READMEs, support tickets.
- Chunk them into passages, ideally along headings so each chunk is about one thing.
- Embed each chunk. An embedding model turns text into a list of numbers (a vector) where similar meanings end up close together.
- Store the vectors, the original text, and metadata (source, date, product version) in a vector database.
Querying (every question)
- Embed the question with the same embedding model.
- Search for the chunks whose vectors are nearest to the question's vector. Often a reranker then reorders the top results for relevance.
- Build the prompt: the question, the top chunks, and an instruction like "Answer only from these sources and cite them."
- Generate the answer, with citations a person can check.
A concrete example
Your team's runbook has a page called "Rotating API keys." A new engineer asks the internal bot: "How do I rotate the payment API key?"
- Without RAG, the model gives a generic answer about API keys that may not match your systems at all.
- With RAG, retrieval finds the "Rotating API keys" chunk, the model answers using your actual steps, and the response links to the runbook page so the engineer can verify it.
Why RAG answers go wrong
When a RAG system gives a bad answer, the model is usually not the culprit. The usual causes:
- Bad chunks. A chunk that starts mid-procedure has no context. The answer inherits the confusion.
- Missing content. If the docs never say it, retrieval can't find it. RAG is a magnifying glass for documentation gaps.
- Stale content. Two versions of the same page, one outdated, both retrieved. The model blends them.
- Vague headings. "Overview" and "Notes" match everything and therefore nothing.
This is why I think of RAG as half engineering, half writing. Clear, well-structured documentation is the best retrieval optimization there is.
Use it on Monday: RAG
- Chat with a long PDF. Most AI chat apps now accept file uploads and do retrieval behind the scenes. Ask questions with "quote the section you used."
- Ask your codebase questions. AI-enabled IDEs index your repository, so "Where do we validate user input for the signup form?" returns real files, not guesses.
- Build a tiny one. A weekend RAG over your team's docs needs four parts: a loader, a chunker, an embedding API, and a vector store (even an in-memory one). Start with twenty documents and a list of ten questions you already know the answers to. Measure before you scale.
Part 3: MCP, one plug for every tool
RAG lets a model read. Tools let it act: create an issue, run a query, check a calendar. The problem used to be that every AI app needed its own custom integration with every tool, a drawer of mismatched chargers.
The Model Context Protocol (MCP), an open standard Anthropic introduced in late 2024, replaces that drawer with one plug. Wrap a tool once as an MCP server, and any MCP-compatible app can use it.
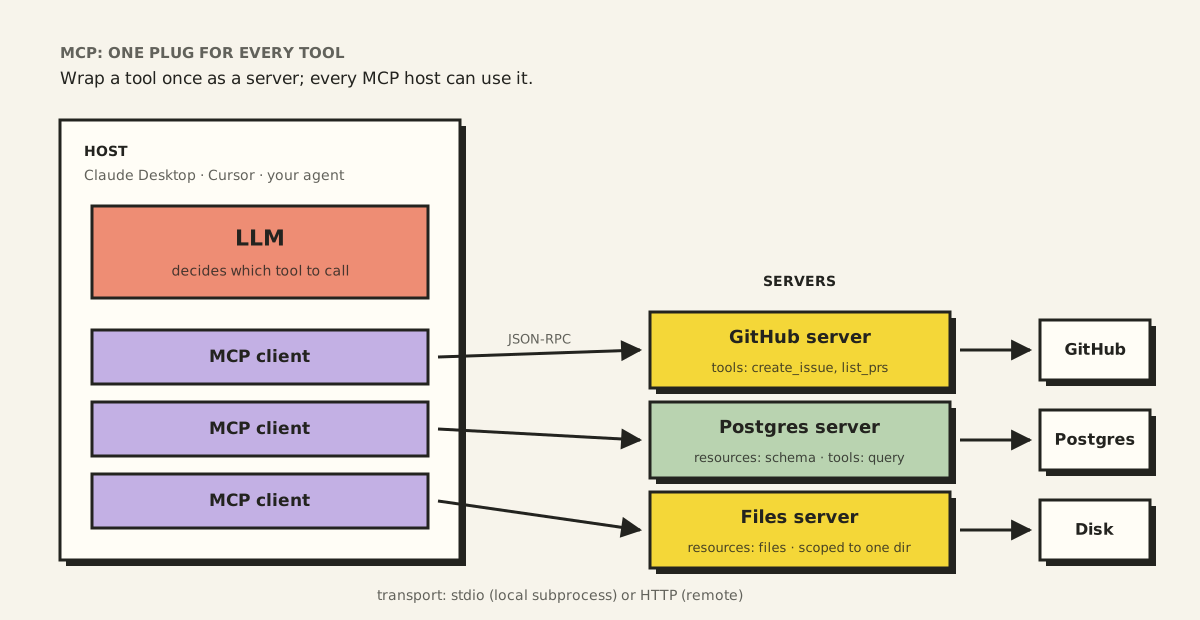
The vocabulary:
- Host: the app you use (an AI desktop app, an IDE, your own agent).
- Client: the connector inside the host, one per server.
- Server: a small program that exposes capabilities in three forms:
- Tools, actions the model can call (
create_issue,run_query); - Resources, data the app can read (a file, a table schema);
- Prompts, reusable templates ("summarize this pull request").
- Tools, actions the model can call (
Messages are JSON-RPC. Locally, the host starts the server as a subprocess and talks over standard input/output; remote servers use HTTP.
What a server looks like
A complete MCP server with one tool, using the official TypeScript SDK:
import { McpServer } from "@modelcontextprotocol/sdk/server/mcp.js";
import { StdioServerTransport } from "@modelcontextprotocol/sdk/server/stdio.js";
import { z } from "zod";

const server = new McpServer({ name: "word-tools", version: "1.0.0" });

server.registerTool(
  "count_words",
  {
    title: "Count words",
    description: "Count the words in a piece of text.",
    inputSchema: { text: z.string() },
  },
  async ({ text }) => ({
    content: [{ type: "text", text: `${text.trim().split(/\s+/).filter(Boolean).length} words` }],
  })
);

await server.connect(new StdioServerTransport());
Notice the description. The model decides whether to call your tool mostly from that one sentence. Tool descriptions are documentation for the most literal reader you will ever have.
Use it on Monday: MCP servers
You'll probably use MCP servers long before you write one. Useful starting points, all available as community or official servers:
| Connect | So you can ask | Keep it safe by |
|---|---|---|
| GitHub | "Summarize open PRs that touch the auth module" | Using a token with read-only scopes at first |
| Postgres or SQLite | "Which tables reference user_id? Draft a query for weekly signups." | Connecting a read-only database user |
| File system | "Find every TODO in the docs folder and group them by file" | Scoping it to one project directory, never your home folder |
| Browser automation | "Open the staging site and check the signup form validation" | Pointing it at staging, not production |
Two rules worth tattooing somewhere: tool output is untrusted input (a fetched web page can contain instructions aimed at the model), and anything with side effects gets a human confirmation (send, delete, merge, pay).
Part 4: Agents, or a model in a loop
Put a model, some tools, and a loop together and you get an agent. Instead of answering once, it decides on an action, runs a tool, reads the result, and decides again until the goal is met.
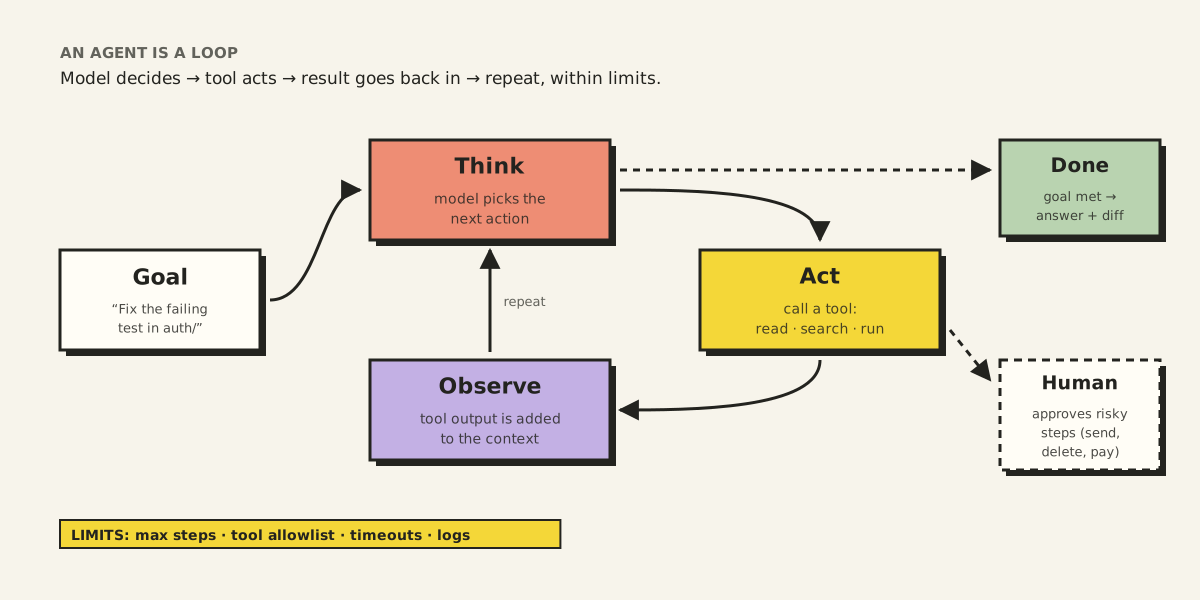
A coding agent fixing a failing test might: read the test file, run the test, read the error, open the source file, edit a line, run the test again, and stop when it passes. Six tool calls, one goal.
The honest advice: don't start with an agent. If the steps are known in advance ("summarize, then translate, then format"), a fixed chain of prompts is cheaper, faster, and far easier to debug. Reach for an agent when the path genuinely depends on what it finds along the way, such as debugging, research, or multi-step data cleanup.
When you do, the limits in the diagram are the job:
- A step budget, so a confused agent stops instead of looping all night.
- A tool allowlist, so it can only touch what the task needs.
- Human approval for side effects, so "delete" is never autonomous.
- Logs of every step, so you can see why it did something.
Use it on Monday: agents
- Coding agents in your IDE or terminal are the most practical agents today. Give them a well-scoped task ("add input validation to this endpoint and update its tests"), not a vague one ("improve the backend").
- Review the diff like a teammate's PR. Agents are fast and confident. Neither is the same as correct.
- Write the task like a ticket. Context, scope, files allowed to change, acceptance criteria. The better the brief, the better the agent.
Putting it together
Here's one request flowing through every layer. An engineer asks the team assistant: "Is the flaky checkout test caused by last week's payment change?"
- Context + RAG: retrieve the test's documentation and last week's release notes.
- Tools via MCP: list recent commits touching
payments/from GitHub; pull the last ten CI runs. - Agent loop: compare failure times with commit times, open the suspicious diff, run the test locally.
- Guardrails: the answer must cite the commits and CI runs it used; nothing is changed without approval.
- App: the answer appears in Slack with links, so a human can verify it in a minute.
No single layer is magic. The quality comes from each one doing its small job well.
The five-line summary
- An LLM predicts text from whatever is in its context window, and nothing else.
- Prompting is writing a clear brief: role, context, task, format, limits.
- RAG fetches your documents at question time so answers are grounded and citable.
- MCP is a standard plug that lets any AI app use any tool, safely if you scope it.
- An agent is a model in a loop with tools; give it a budget, an allowlist, and a human for risky steps.
Learn these five and every new AI announcement becomes much easier to read: it's almost always an improvement to one of these layers, wearing a new name.